
今天早上看到这个消息,看了下安装,Windows最简单。直接运行即可。简单方便。
从 Release 获取对应系统的最新版本
获取 ClientId 与 ClientSecret
登录Azure:https://portal.azure.com/ 或 https://portal.azure.cn/ (世纪互联)
点击 Azure Active Directory / 应用注册 / 新注册
名字任意取,账户类型为 任何组织目录(任何 Azure AD 目录 - 多租户)中的帐户,重定向URL为 https://你的域名/api/admin/bind/new
点击 概述,记录应用程序(客户端)ID,即为 ClientId
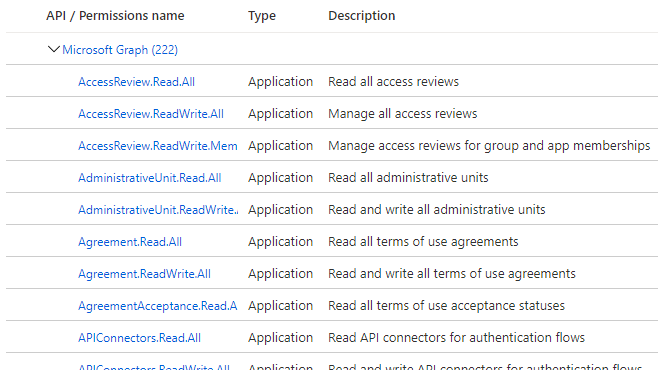
点击 API 权限 / 添加权限 / Microsoft Graph / 委托的权限
勾选 Files.ReadWrite.All 和 Sites.ReadWrite.All
点击 证书和密码 / 新客户端密码,创建密码并记录为 ClientSecret
配置 appsettings.json
从解压后的文件目录中找到 appsettings.json 并修改
{
  "Logging": {
    "LogLevel": {
      "Microsoft": "Warning",
      "Microsoft.Hosting.Lifetime": "Information"
    }
  },
  "AllowedHosts": "*",
  "ConnectionString": "Data Source=YukiDrive.db;",
  "ClientId": "",
  "ClientSecret": "",
  "ListeningUrls": "https://*:1272;http://*:1273",
  "Certificate" : {
    "Enable" : true,
    "FilePath" : "",
    "Password" : ""
  },
  "BaseUri":"https://localhost:1272",
  "Proxy":"",
  "Type":"",
  "AccountName": "",
  "DominName": "",
  "AdminName" : "",
  "AdminPassword": ""
}
ClientId 与 ClientSecret 填写在上一步所得值
ListeningUrls 和 Certificate 与 https 证书有关,下一步再讲
BaseUri 修改为你的域名,有端口必须带上端口号,必须使用 https
Type 为你的 Office 账户地区,可选择为
China世纪互联Global国际版
AccountName 为你的 Office账户名,如:Sakura@yukistudio.onmicrosoft.com
DominName 为你的 SharePoint 域名,登录 SharePoint 就能在浏览器地址栏看到,如:yukistudio.sharepoint.com
AdminName 和 AdminPassword 为网站后台的账户和密码
设置 https
了解配置中的 ListeningUrls
ListeningUrls 项填 http://*:1273 为监听 1273 端口,你可以将域名解析至服务器,访问
Http://你的域名:1273 就是你的程序。
类型1:不使用诸如 nginx、apache 此类的服务器
使用程序自带服务器,但你要手动配置 https
将你的域名证书转换为 pfx 格式,会得到 pfx文件 和 密码,放置于任意目录
修改 appsettings.json 的 Certificate 项
FilePath 填写为证书路径,Password 即为证书的密码,Enable 保持为 true
此时 Https://你的域名:1272 为你的网盘程序访问路径
类型2:使用宝塔面板
修改配置文件
删除 ListeningUrls 下的 https://*:1272
将 Certificate 的 Enable 修改为 false
宝塔设置
创建网站,设置为纯静态。
绑定域名并申请证书,开启 https
点击 站点修改 / 配置文件
删除
location ~ .*\.(gif|jpg|jpeg|png|bmp|swf)$
    {
        expires      30d;
        error_log off;
        access_log /dev/null;
    }
添加
location / {
        proxy_pass         http://localhost:1273; #填写为配置文件中的 Listening Urls
        proxy_http_version 1.1;
        proxy_set_header   Upgrade $http_upgrade;
        proxy_set_header   Connection keep-alive;
        proxy_set_header   Host $host;
        proxy_cache_bypass $http_upgrade;
        proxy_set_header   X-Forwarded-For $proxy_add_x_forwarded_for;
        proxy_set_header   X-Forwarded-Proto $scheme;
    }
修改
root /www/wwwroot/yukidrive/linux/wwwroot; # 填写为 程序所在目录/wwwroot
最后应该类似于
server
{
    listen 80;
	listen 443 ssl http2;
    server_name drive.test.yukino.co drive.yukino.co;
    index index.php index.html index.htm default.php default.htm default.html;
    root /www/wwwroot/yukidrive/linux/wwwroot;

    location / {
        proxy_pass         http://localhost:1273;
        proxy_http_version 1.1;
        proxy_set_header   Upgrade $http_upgrade;
        proxy_set_header   Connection keep-alive;
        proxy_set_header   Host $host;
        proxy_cache_bypass $http_upgrade;
        proxy_set_header   X-Forwarded-For $proxy_add_x_forwarded_for;
        proxy_set_header   X-Forwarded-Proto $scheme;
    }

    #SSL-START SSL相关配置,请勿删除或修改下一行带注释的404规则
    #error_page 404/404.html;
    ssl_certificate    /www/server/panel/vhost/cert/drive.test.yukino.co/fullchain.pem;
    ssl_certificate_key    /www/server/panel/vhost/cert/drive.test.yukino.co/privkey.pem;
    ssl_protocols TLSv1.1 TLSv1.2 TLSv1.3;
    ssl_ciphers ECDHE-RSA-AES128-GCM-SHA256:HIGH:!aNULL:!MD5:!RC4:!DHE;
    ssl_prefer_server_ciphers on;
    ssl_session_cache shared:SSL:10m;
    ssl_session_timeout 10m;
    error_page 497  https://$host$request_uri;

    #SSL-END
    #REWRITE-START URL重写规则引用,修改后将导致面板设置的伪静态规则失效
    include /www/server/panel/vhost/rewrite/drive.test.yukino.co.conf;
    #REWRITE-END

    #禁止访问的文件或目录
    location ~ ^/(\.user.ini|\.htaccess|\.git|\.svn|\.project|LICENSE|README.md)
    {
        return 404;
    }

    #一键申请SSL证书验证目录相关设置
    location ~ \.well-known{
        allow all;
    }


    location ~ .*\.(js|css)?$
    {
        expires      12h;
        error_log off;
        access_log /dev/null;
    }
    access_log  /www/wwwlogs/drive.test.yukino.co.log;
    error_log  /www/wwwlogs/drive.test.yukino.co.error.log;
}
类型3:使用 nginx 反代
修改配置文件
删除 ListeningUrls 下的 https://*:1272
将 Certificate 的 Enable 修改为 false
配置 Nginx
创建站点配置文件,并将内容替换为以下内容:
server
{
    listen 80;
		listen 443 ssl http2;
    server_name example.com *.example.com; #你的域名
    root /www/wwwroot/yukidrive/linux/wwwroot; # 填写为 程序所在目录/wwwroot

    location / {
        proxy_pass         http://localhost:1273; #填写为配置文件中的 Listening Urls
        proxy_http_version 1.1;
        proxy_set_header   Upgrade $http_upgrade;
        proxy_set_header   Connection keep-alive;
        proxy_set_header   Host $host;
        proxy_cache_bypass $http_upgrade;
        proxy_set_header   X-Forwarded-For $proxy_add_x_forwarded_for;
        proxy_set_header   X-Forwarded-Proto $scheme;
    }

    #SSL-START
    ssl on;
		ssl_certificate server.crt; #(证书公钥)
		ssl_certificate_key server.key; #(证书私钥)

		ssl_session_timeout 5m;
		ssl_protocols  SSLv2 SSLv3 TLSv1;
		ssl_ciphers  HIGH:!aNULL:!MD5;
		ssl_prefer_server_ciphers on;
    #SSL-END
}
启动并登录后台绑定账户
未绑定之前直接访问域名会显示 出现错误:undefined 不必理会
配置完成后,跳转到程序目录执行 ./YukiDrive 就开始运行了。
Windows 用户直接打开 YukiDrive.exe 开始运行。
绑定账号
请先确认站点的 https 可用再进行下一步操作。
在浏览器中访问 https://你的域名/#/login 登录,进入后台后找到 SharePoint 账户,点击认证后登录你的微软账户。认证完成后会跳转回后台,此时将会显示为已认证
添加 Onedrive
点击添加站点,站点名称填写为 onedrive ,显示名随意。
添加任意多个 SharePoint
点击添加站点,站点名称填写为 SharePoint 创建网站时所填写的站点名称(建议创建为英文字符),显示名随意。
守护程序进程
Windows 用户不必考虑此配置
在 Linux 上的程序仅运行于本地账户,退出即关闭,应该将其注册为服务以便能够开机自启和出错重启
做一些修改后复制下列整条语句到控制台执行
echo "[Unit]
Description=YukiDrive

[Service]
WorkingDirectory=/www/wwwroot/yukidrive/linux #修改为 程序所在目录
ExecStart=/www/wwwroot/yukidrive/linux/YukiDrive #修改为 程序目录/YukiDrive
Restart=always
RestartSec=10
KillSignal=SIGINT
SyslogIdentifier=dotnet-YukiDrive
User=root
Environment=ASPNETCORE_ENVIRONMENT=Production
Environment=DOTNET_PRINT_TELEMETRY_MESSAGE=false

[Install]
WantedBy=multi-user.target" > /etc/systemd/system/YukiDrive.service
启动服务
systemctl enable YukiDrive.service
systemctl start YukiDrive.service
查看服务状态
systemctl status YukiDrive.service
显示以下语句即为正常运行
● YukiDrive.service - YukiDrive
   Loaded: loaded (/etc/systemd/system/YukiDrive.service; enabled; vendor preset: enabled)
   Active: active (running) since Mon 2020-03-23 23:39:50 EDT; 2h 6min ago
 Main PID: 7206 (YukiDrive)
    Tasks: 14 (limit: 4915)
   CGroup: /system.slice/YukiDrive.service
           └─7206 /www/wwwroot/yukidrive/linux/YukiDrive

Mar 23 23:39:50 ThoroughUnconscious-VM systemd[1]: Started Example .NET Web API App running on Ubuntu.
Mar 23 23:39:50 ThoroughUnconscious-VM dotnet-YukiDrive[7206]: 开始启动程序...
Mar 23 23:39:54 ThoroughUnconscious-VM dotnet-YukiDrive[7206]: Hosting environment: Production
Mar 23 23:39:54 ThoroughUnconscious-VM dotnet-YukiDrive[7206]: Content root path: /www/wwwroot/yukidrive/linux
Mar 23 23:39:54 ThoroughUnconscious-VM dotnet-YukiDrive[7206]: Now listening on: http://localhost:1273
Mar 23 23:39:54 ThoroughUnconscious-VM dotnet-YukiDrive[7206]: Application started. Press Ctrl+C to shut down.
退出服务
systemctl stop YukiDrive.service


