创建一个示例RN应用程序,从Expo的create-react-native-app(CRNA)开始,并将其配置为使用Typescript开发我们的RN代码。
1.使用CRNA创建React Native项目
$ yarn global add create-react-native-app打开终端,并cd选择您的工作文件夹。运行以下命令以创建新的React Native项目:
create-react-native-app CRNAExpoTSExample在此命令中,CRNA将为您构建一个非常基本但可立即运行的React Native应用程序。一旦应用程序创建,cd以创建应用程序的项目文件夹,并确保通过CRNA脚手架基本初始应用程序正在工作。
2.添加Typescript
安装依赖项
yarn add typescript tslint -D yarn add @types/react @types/react-native @types/react-dom -D我们还需要rimraf和concurrently清理ts-transpiled-to-js文件的输出文件夹并同时运行npm脚本
yarn add concurrently rimraf -D配置
tsc --inittsconfig.json
在代码编辑器中打开项目并更新tsconfig.json为以下内容:
{ "compilerOptions": { "module":"es2015", "target": "es2015", "jsx": "react", "rootDir": "src", "outDir": "build", "allowSyntheticDefaultImports": true, "noImplicitAny": true, "sourceMap": true, "experimentalDecorators": true, "preserveConstEnums": true, "allowJs": true, "noUnusedLocals": true, "noUnusedParameters": true, "noImplicitReturns": true, "skipLibCheck": true, "moduleResolution":"Node" }, "filesGlob": [ "typings/index.d.ts", "src/**/*.ts", "src/**/*.tsx", "node_modules/typescript/lib/lib.es6.d.ts" ], "types": [ "react", "react-dom", "react-native" ], "exclude":[ "build", "node_modules", "jest.config.js", "App.js" ], "compileOnSave": false }我们想将所有的Typescript应用程序代码文件存储在该src文件夹下的文件夹/子文件夹中。使用“rootDir”: “src ,Typescript编译器将查找文件夹及其子文件夹中的所有 文件.ts或 .tsx文件src。
“outDir”: “build”表示Typescript将在build文件夹下输出已转换的Javascript文件。
添加tslint.json
tslint.json在项目文件夹下添加文件,其内容如下:
{ "rules": { "member-access": false, "member-ordering": [ true, "public-before-private", "static-before-instance", "variables-before-functions" ], "no-any": false, "no-inferrable-types": [false], "no-internal-module": true, "no-var-requires": true, "typedef": [false], "typedef-whitespace": [ true, { "call-signature": "nospace", "index-signature": "nospace", "parameter": "nospace", "property-declaration": "nospace", "variable-declaration": "nospace" }, { "call-signature": "space", "index-signature": "space", "parameter": "space", "property-declaration": "space", "variable-declaration": "space" } ], "ban": false, "curly": false, "forin": true, "label-position": true, "no-arg": true, "no-bitwise": true, "no-conditional-assignment": true, "no-console": [ true, "debug", "info", "time", "timeEnd", "trace" ], "no-construct": true, "no-debugger": true, "no-duplicate-variable": true, "no-empty": true, "no-eval": true, "no-null-keyword": true, "no-shadowed-variable": true, "no-string-literal": true, "no-switch-case-fall-through": true, "no-unused-expression": true, "no-use-before-declare": true, "no-var-keyword": true, "radix": true, "switch-default": true, "triple-equals": [ true, "allow-undefined-check" ], "eofline": false, "indent": [ true, "spaces" ], "max-line-length": [ true, 150 ], "no-require-imports": false, "no-trailing-whitespace": true, "object-literal-sort-keys": false, "trailing-comma": [ true, { "multiline": "never", "singleline": "never" } ], "align": [true], "class-name": true, "comment-format": [ true, "check-space" ], "interface-name": [false], "jsdoc-format": true, "no-consecutive-blank-lines": [true], "no-parameter-properties": false, "one-line": [ true, "check-open-brace", "check-catch", "check-else", "check-finally", "check-whitespace" ], "quotemark": [ true, "single", "avoid-escape" ], "semicolon": [ true, "always", "ignore-interfaces" ], "variable-name": [ true, "allow-leading-underscore", "ban-keywords" ], "whitespace": [ true, "check-branch", "check-decl", "check-operator", "check-separator", "check-type" ] } }创建src和build 文件夹
由于我们配置src和build为rootDir和outputDir中tsconfig.json,创建我们项目的根文件夹下这些文件夹。
当我们create-react-native-app CRNAExpoTSExample使用CRNA命令()创建项目时,它在我们的项目文件夹下添加了一个App.js和App.test.js。这些文件移动到SRC我们创建的文件夹,然后重命名App.js,并App.test.js以App.tsx和App.test.tsx分别。
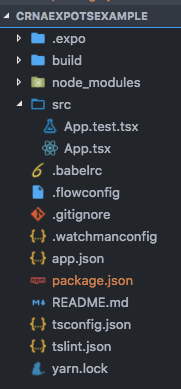
此时,您的项目文件夹和文件应如下所示:
在package.json中添加一些脚本
当我们使用CRNA命令创建上面的项目时,package.json它在scaffolded项目文件夹中创建的文件包含以下脚本:
... “scripts”:{ “start”:“react-native-scripts start”, “eject”:“react-native-scripts弹出”, “Android”:“react-native-scripts android”, “ios” :“react-native-scripts ios”, “test”:“node node_modules / jest / bin / jest.js” } ...现在,我们将添加更多脚本来运行我们的任务来编译Typescript,创建构建并启动我们的应用程序:
"lint": "tslint src/**/*.ts", "tsc": "tsc", "clean": "rimraf build", "build": "yarn run clean && yarn run tsc --", "watch": "yarn run build -- -w", "watchAndRunAndroid": "concurrently "yarn run watch" "yarn run android"", "buildRunAndroid": "yarn run build && yarn run watchAndRunAndroid ", "watchAndRunIOS": "concurrently "yarn run watch" "yarn run ios"", "buildRunIOS": "yarn run build && yarn run watchAndRunIOS ", "watchAndStart": "concurrently "yarn run watch" "yarn run start"", "buildAndStart": "yarn run build && yarn run watchAndStart "在项目的根文件夹下添加App.js
请注意,在package.json最初由CRNA创建的文件中,app 的“main”入口点设置为:
“main”:“./ node_modules/react-native-scripts/build/bin/crna-entry.js”意味着我们的应用程序从此crna-entry.js 文件开始。打开这个文件,你会发现它引用了我们的App.js文件:
<span style="color:rgba(0, 0, 0, 0.84)">var _App = require('../../../../ App');</span>这意味着它期望app模块位于App.js我们项目的根文件夹下的文件中。但是,我们将原始App.js文件移动到该src文件夹。此外,Typescript编译器将在该build文件夹下输出已转换的ts-to-js文件。
因此,为了让CRNA使用我们更改的文件夹结构和我们的Typescript配置,让我们App.js在项目文件夹下添加一个文件,该文件将只导出我们的App组件src/App.tsx,Typescript编译器将输出到该build文件夹。
App.js在项目的根文件夹下创建文件:
import App from './build/App'; export default App;3.运行我们的应用程序
我们现在都设置为运行我们的Typescript应用程序。运行命令:
yarn run buildAndStart注:好了,到此,你的项目应该已经运行起来了,有任何疑问,欢迎留言。