对NIO的理解
个人单方面认为,NIO与BIO的最大区别在于主动和被动,使用BIO的方式需要等待被调用方返回数据,很明显此时调用者是被动的。
举个例子
阻塞IO
假设你是一个胆小又害羞的男孩子,你约了隔壁测试的妹子,但你并不敢主动约会,所以你把自己的手机号码给她,并暗示她想要约会的时候打电话给你。很明显此时你陷入了被动,约不约会的结果需要妹子主动告知你,如果她忘了,那么你要陷入长时间的等待中以及无尽的猜测和自我怀疑中(太惨了)。[如果你是一个胆小害羞又好色的男孩子,那就惨了]
非阻塞IO 我们知道,渣男通常有很多的备胎,我管这个叫做备胎池(SpareTirePool), 那么当他想要约会的时候,只要群发问妹子要不要约会,如果要约会的话就和妹子约会,约会结束之后,处理其他约会事件,如果没有继续下一次询问。在这个例子中约会可以视为IO事件,问妹子的过程可以视为备胎池的轮询。
Tomcat 如何使用NIO
- SeverSocket的启动
- I/O事件的处理
P.S. 文章太长,如果不想看可以直接阅读结论
ServerSocket的启动
以下bind方法代码是启动ServerSocket的流程,主要流程如下
@Override public void bind() throws Exception { if (!getUseInheritedChannel()) { serverSock = ServerSocketChannel.open(); socketProperties.setProperties(serverSock.socket()); InetSocketAddress addr = (getAddress()!=null?new InetSocketAddress(getAddress(),getPort()):new InetSocketAddress(getPort())); serverSock.socket().bind(addr,getAcceptCount()); } else { // Retrieve the channel provided by the OS Channel ic = System.inheritedChannel(); if (ic instanceof ServerSocketChannel) { serverSock = (ServerSocketChannel) ic; } if (serverSock == null) { throw new IllegalArgumentException(sm.getString("endpoint.init.bind.inherited")); } } // 以阻塞的方式来接收连接!! serverSock.configureBlocking(true); //mimic APR behavior // 设置Acceptor和Poller的数量 if (acceptorThreadCount == 0) { // FIXME: Doesn't seem to work that well with multiple accept threads // 顾名思义,Acceptor是用来处理新连接的 acceptorThreadCount = 1; } if (pollerThreadCount <= 0) { // Poller 用来处理I/O事件 pollerThreadCount = 1; } setStopLatch(new CountDownLatch(pollerThreadCount)); // Initialize SSL if needed initialiseSsl(); // 从此处可以看出tomcat池化了selector selectorPool.open(); }Tomcat NIO 如何处理I/O事件
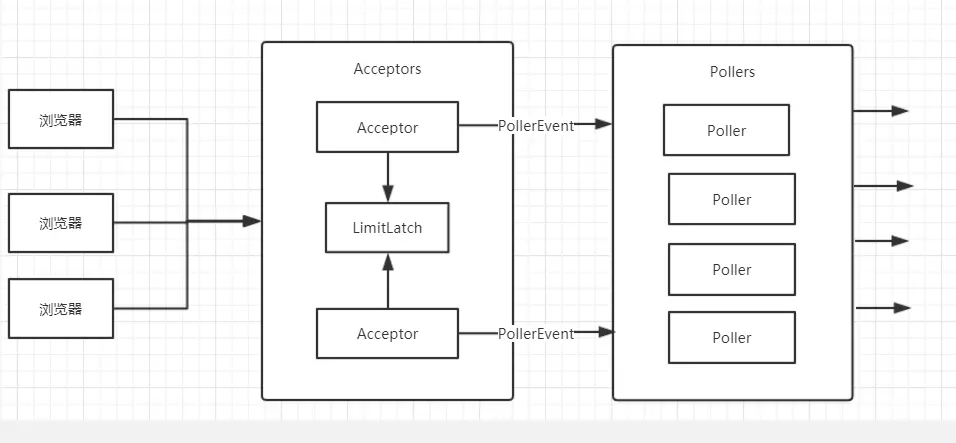
先说结论,Tomcat NIO模型中有以下关键角色
- Acceptor 用于接收新连接,每个Acceptor一个线程,以阻塞的方式接收新连接
- Poller 当Acceptor接收到新连接,进行处理之后选择一个Poller处理该连接上的I/O事件。
- LimitLatch 一个用来限制连接数的锁
Acceptor
Acceptor的主要工作就是不断接收来自客户端的连接,在简单处理之后将该连接交给Poller处理
接收来自客户端连接, 如果你不想看代码,以下是其主要流程
- 接收来自客户端的连接,并将其交给Poller处理
@Override public void run() { int errorDelay = 0; // running的检测贯穿了Accpetor的处理流程,在每次关键操作的时候都会执行检测 while (running) { // 如果进入暂停状态则每隔一段时间检测一下 while (paused && running) { state = AcceptorState.PAUSED; try { Thread.sleep(50); } catch (InterruptedException e) { // Ignore } } // 再次检测 if (!running) { break; } state = AcceptorState.RUNNING; try { //检查是否达到最大连接数如果是则陷入等待,如果不是则增加当前连接数 countUpOrAwaitConnection(); SocketChannel socket = null; try { //接收新连接 socket = serverSock.accept(); } catch (IOException ioe) { // 发生异常,则减少连接数 countDownConnection(); if (running) { handleExceptionWithDelay(errorDelay); // re-throw throw ioe; } else { break; } } // Successful accept, reset the error delay errorDelay = 0; // Configure the socket if (running && !paused) { //setSocketOptions会导致将该连接交给Poller处理 if (!setSocketOptions(socket)) { closeSocket(socket); } } else { closeSocket(socket); } } catch (Throwable t) { ExceptionUtils.handleThrowable(t); log.error(sm.getString("endpoint.accept.fail"), t); } } state = AcceptorState.ENDED; }再来看看setSocketOptions做了什么,不想看代码的话,总结如下
- 将客户端socket设置为非阻塞模式
- 将客户端的socket封装为NioChannel或SecureNioChannel(使用了对象池技术)
- 从Poller池中获取一个Poller,将NioChannel注册到Poller上
protected boolean setSocketOptions(SocketChannel socket) { // Process the connection try { //设置为非阻塞模式,以便通过selector进行查询 socket.configureBlocking(false); Socket sock = socket.socket(); socketProperties.setProperties(sock); //从对象池中获取一个NioChannel,tomcat会复用一切可以复用的对象以减少创建新对象所带来的消耗 NioChannel channel = nioChannels.pop(); if (channel == null) { // 没有获取到,那就新建一个呗 SocketBufferHandler bufhandler = new SocketBufferHandler( socketProperties.getAppReadBufSize(), socketProperties.getAppWriteBufSize(), socketProperties.getDirectBuffer()); // SSL这一块还没研究 if (isSSLEnabled()) { channel = new SecureNioChannel(socket, bufhandler, selectorPool, this); } else { channel = new NioChannel(socket, bufhandler); } } else { channel.setIOChannel(socket); //重新设置SocketBufferHandler,将其设置为可写和可读 channel.reset(); } //从Poller池中获取一个Poller(按照次序获取,可以理解为一个圆环),并将Channel注册到上面 getPoller0().register(channel); } catch (Throwable t) { ExceptionUtils.handleThrowable(t); try { log.error("",t); } catch (Throwable tt) { ExceptionUtils.handleThrowable(tt); } // Tell to close the socket return false; } return true; } Poller
从连接注册到Poller说起
不加锁的获取一个Poller
具体说明见代码
关键点:对一个数A取余会将余数的结果限制在A的范围内
/** * Return an available poller in true round robin fashion. * 很明显,取余的方式揭示了获取Poller的方法。你可以理解为 * Poller会组成一个圆环,这样我们就可以通过不断递增获取 * 下一个Poller,但是数据会溢出所以我们要取绝对值 * @return The next poller in sequence */ public Poller getPoller0() { int idx = Math.abs(pollerRotater.incrementAndGet()) % pollers.length; return pollers[idx]; }channel的注册
该方法会对新的建的连接进行封装,并以PollerEvent的形式注册到相应的Poller中
需要注意的是,真正的注册读事件并不是在此方法注册的(当前方法调用者为Acceptor线程),而是在Poller线程中注册读事件的
/** * Registers a newly created socket with the poller. * 将新建的socket注册到Poller上 * @param socket The newly created socket */ public void register(final NioChannel socket) { //以下代码为设置各种参数,可以从方法名进行推测,不再进行叙述 socket.setPoller(this); NioSocketWrapper ka = new NioSocketWrapper(socket, NioEndpoint.this); socket.setSocketWrapper(ka); ka.setPoller(this); ka.setReadTimeout(getSocketProperties().getSoTimeout()); ka.setWriteTimeout(getSocketProperties().getSoTimeout()); ka.setKeepAliveLeft(NioEndpoint.this.getMaxKeepAliveRequests()); ka.setSecure(isSSLEnabled()); ka.setReadTimeout(getConnectionTimeout()); ka.setWriteTimeout(getConnectionTimeout()); //从缓存中获取一个PollerEvent PollerEvent r = eventCache.pop(); // 注册读事件 ka.interestOps(SelectionKey.OP_READ);//this is what OP_REGISTER turns into. // 如果没有从缓存中获取,那么就新建一个 if ( r==null) r = new PollerEvent(socket,ka,OP_REGISTER); else r.reset(socket,ka,OP_REGISTER); addEvent(r); }Poller处理I/O 事件
Poller 处理I/O事件的的代码较长,而且细节也较多,总结其主要作用如下
- 检测是否有Acceptor提交PollerEvent,如果有则调用PolllerEvent的run方法注册读事件
- 在执行关键操作的时候检测该Poller是否被关闭如果是,则执行相应的资源释放和关闭操作
- 调用selector.select() 轮询事件,如果有读事件则交给processKey处理
@Override public void run() { // Loop until destroy() is called // 一直循环直到destroy方法被调用 while (true) { boolean hasEvents = false; try { if (!close) { // events 方法会处理Acceptor注册到Poller中的PollerEvent // 主要是注册读事件 hasEvents = events(); if (wakeupCounter.getAndSet(-1) > 0) { //if we are here, means we have other stuff to do //do a non blocking select keyCount = selector.selectNow(); } else { keyCount = selector.select(selectorTimeout); } wakeupCounter.set(0); } // 检测到关闭,则处理剩余的事件并关闭selector if (close) { // 处理Acceptors注册到Poller中的PollerEvent events(); //selector time out 或者poller被关闭就会调用timeout方法 timeout(0, false); try { selector.close(); } catch (IOException ioe) { log.error(sm.getString("endpoint.nio.selectorCloseFail"), ioe); } break; } } catch (Throwable x) { ExceptionUtils.handleThrowable(x); log.error("",x); continue; } //either we timed out or we woke up, process events first if ( keyCount == 0 ) hasEvents = (hasEvents | events()); // 执行 select 操作,查询I/O事件 Iterator<SelectionKey> iterator = keyCount > 0 ? selector.selectedKeys().iterator() : null; // Walk through the collection of ready keys and dispatch // any active event. while (iterator != null && iterator.hasNext()) { SelectionKey sk = iterator.next(); NioSocketWrapper attachment = (NioSocketWrapper)sk.attachment(); // Attachment may be null if another thread has called // cancelledKey() if (attachment == null) { iterator.remove(); } else { iterator.remove(); // 处理检测到的I/O事件 processKey(sk, attachment); } }//while //timeout 会检查是否关闭,如果已经关闭并且有事件未处理会调用cancelledKey方法 //cancelledKey:该方法主要是对和该连接相关的资源执行关闭操作 timeout(keyCount,hasEvents); }//while getStopLatch().countDown(); }processKey 处理I/O事件
processKey主要工作如下
- 再次检测Poller是否关闭,如果是则释放资源
- 检测查询到事件是否合法,如果合法则取消已注册到selector上的事件且被被本次轮询所查询到的事件
- 再调用processSocket处理读事件,之后处理写事件
protected void processKey(SelectionKey sk, NioSocketWrapper attachment) { try { if ( close ) { // 如果Poller关闭则关闭和释放和此连接相关的资源 cancelledKey(sk); } else if ( sk.isValid() && attachment != null ) { if (sk.isReadable() || sk.isWritable() ) { if ( attachment.getSendfileData() != null ) { processSendfile(sk,attachment, false); } else { // 取消注册事件 // sk.interestOps()& (~readyOps) unreg(sk, attachment, sk.readyOps()); boolean closeSocket = false; // Read goes before write 先读后写 if (sk.isReadable()) { // 关键代码,调用processSocket方法处理读事件 if (!processSocket(attachment, SocketEvent.OPEN_READ, true)) { closeSocket = true; } } if (!closeSocket && sk.isWritable()) { if (!processSocket(attachment, SocketEvent.OPEN_WRITE, true)) { closeSocket = true; } } if (closeSocket) { cancelledKey(sk); } } } } else { //invalid key cancelledKey(sk); } } catch ( CancelledKeyException ckx ) { cancelledKey(sk); } catch (Throwable t) { ExceptionUtils.handleThrowable(t); log.error("",t); } }processSocket 真-处理I/O事件
processSocket定义在org.apache.tomcat.util.net.AbstractEndPoint中, 也就是意味着无论你采用的是BIO还是NIO或者NIO2最终读写数据都是调用此方法
从代码中可以看出,依然是对象池,依然是再次封装(套娃),并将其提交到线程池中执行,接下来的内容就不再本次讨论范围内呢。
public boolean processSocket(SocketWrapperBase<S> socketWrapper, SocketEvent event, boolean dispatch) { try { if (socketWrapper == null) { return false; } SocketProcessorBase<S> sc = processorCache.pop(); if (sc == null) { sc = createSocketProcessor(socketWrapper, event); } else { sc.reset(socketWrapper, event); } Executor executor = getExecutor(); if (dispatch && executor != null) { executor.execute(sc); } else { sc.run(); } } catch (RejectedExecutionException ree) { getLog().warn(sm.getString("endpoint.executor.fail", socketWrapper) , ree); return false; } catch (Throwable t) { ExceptionUtils.handleThrowable(t); // This means we got an OOM or similar creating a thread, or that // the pool and its queue are full getLog().error(sm.getString("endpoint.process.fail"), t); return false; } return true; }总结
Tomcat的NIO模型
手抖了,线不怎么♂
LimitLatch 为所有的Acceptor共用,用来限制当前的最大连接数
Acceptor 以阻塞的形式来接收新连接,并将其封装成PollerEvent对象提交到Poller中
Poller 接收来自Acceptor的PollerEvent并注册读事件,以及轮询和其绑定的客户端Socket有无读事件,如果有则执行进一步操作,将其提交到其他地方执行处理(解析Http协议)
思想迁移
学习源码就是为了学习其设计思想. — 沃兹及.硕德
对象池化 池化对象、池化连接可以大大降低新建对象以及GC所带来的消耗,当需要使用从池中取出来重新设置相关值即可
环形队列 虽然这玩意不新鲜,但配合上原子类,就可以在高并发的情况,高效的获取队列中的下一个元素(环形队列中索引溢出的处理在之前我是没有考虑到的)
阻塞获取链接,非阻塞处理IO事件 与Reactor模型形成强烈的对比,学习NIO的时候思维被限制住了,认为非阻塞的获取连接会获得更高的性能,但现在情况不一定了(还没测试,哪位老哥试了告诉我一下)
关键操作时,对标志位进行检测 如果你要通过一个标志变量来控制你的线程,且线程循环一次需要相对较长的时间(你代码太长,操作太多)那么最好在执行关键操作之前对你的标志变量进行检查,来决定是否要改变线程的行为(康康poller和Acceptor的代码)
初次学习Tomcat的代码,有理解错误的地方还请大佬指出
![]()