国内很多都在推Frantech旗下的Buyvm,这家的价格的确便宜,下面是各种配置的价格
BuyVM AMD锐龙 VPS配置价格
| CPU | 内存 | 硬盘 | 价格 | 机房 | 机房 | 机房 |
|---|---|---|---|---|---|---|
| 1核 | 512m | 10G | $2 | 拉斯维加斯 | 纽约 | 卢森堡 |
| 1核 | 1G | 20G | $3.5 | 拉斯维加斯 | 纽约 | 卢森堡 |
| 1核 | 2G | 40G | $7 | 拉斯维加斯 | 纽约 | 卢森堡 |
| 1核 | 4G | 80G | $15 | 拉斯维加斯 | 纽约 | 卢森堡 |
| 2核 | 8G | 160G | $30 | 拉斯维加斯 | 纽约 | 卢森堡 |
| 3核 | 12G | 240G | $45 | 拉斯维加斯 | 纽约 | 卢森堡 |
| 4核 | 16G | 320G | $60 | 拉斯维加斯 | 纽约 | 卢森堡 |
| 6核 | 24G | 480G | $90 | 拉斯维加斯 | 纽约 | 卢森堡 |
BuyVM Block Storage(存储块)价格
| Block Storage | 价格 | 机房 | 机房 | 机房 |
|---|---|---|---|---|
| 256 G存储 | $1.25 | 拉斯 | 纽约 | 卢森堡 |
| 512 G存储 | $2.5 | 拉斯 | 纽约 | 卢森堡 |
| 1 TB 存储 | $5 | 拉斯 | 纽约 | 卢森堡 |
| 2 TB 存储 | $10 | 拉斯 | 纽约 | 卢森堡 |
| 3 TB 存储 | $15 | 拉斯 | 纽约 | 卢森堡 |
| 10 TB存储 | $50 | 拉斯 | 纽约 | 卢森堡 |
他们家经常没有货,使用的人贼多,当然邻居也是各种折腾
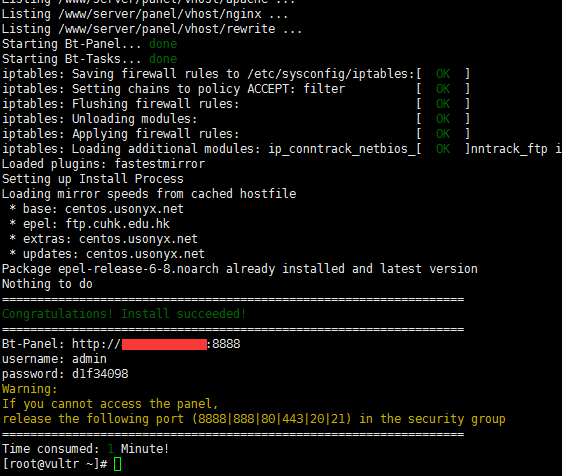
其实这个配置很早就拿到了。一直没有时间折腾。今天折腾下。
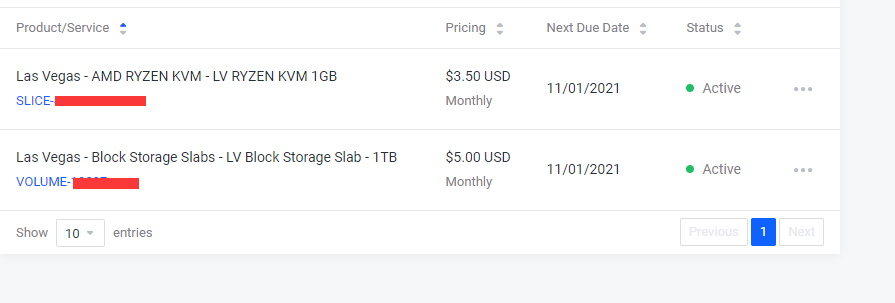
这个配置买了一个月了。闲置,于是今天把存储块搞上。
1、查看 存储快;
/dev/disk/by-id/fdisk –l
这两个都可以看到
Welcome to fdisk (util-linux 2.32.1).
Changes will remain in memory only, until you decide to write them.
Be careful before using the write command.
Device does not contain a recognized partition table.
Created a new DOS disklabel with disk identifier 0xb12d8bec.
Command (m for help): n #这里输入n
Partition type
p primary (0 primary, 0 extended, 4 free)
e extended (container for logical partitions)
Select (default p): p
Partition number (1-4, default 1): 2
First sector (2048-536870911, default 2048): 2048 #这里就默认即可
Last sector, +sectors or +size{K,M,G,T,P} (2048-536870911, default 536870911): #默认即可
Created a new partition 2 of type ‘Linux’ and of size 256 GiB.
Command (m for help): w #这里输入w
The partition table has been altered.
Calling ioctl() to re-read partition table.
Syncing disks.
[root@prtg ~]# fdisk -l
Disk /dev/vda: 10 GiB, 10737418240 bytes, 20971520 sectors
Units: sectors of 1 * 512 = 512 bytes
Sector size (logical/physical): 512 bytes / 512 bytes
I/O size (minimum/optimal): 512 bytes / 512 bytes
Disklabel type: dos
Disk identifier: 0x508858de
Device Boot Start End Sectors Size Id Type
/dev/vda1 * 2048 19920511 19918464 9.5G 83 Linux
/dev/vda2 19920512 20969087 1048576 512M 82 Linux swap / Solaris
Disk /dev/sda: 256 GiB, 274877906944 bytes, 536870912 sectors
Units: sectors of 1 * 512 = 512 bytes
Sector size (logical/physical): 512 bytes / 512 bytes
I/O size (minimum/optimal): 512 bytes / 512 bytes
Disklabel type: dos
Disk identifier: 0xb12d8bec
Device Boot Start End Sectors Size Id Type
/dev/sda2 2048 536870911 536868864 256G 83 Linux
查看存储块编号
[root@prtg ~]# ls /dev/disk/by-id/
ata-QEMU_DVD-ROM_QM00004 scsi-0BUYVM_SLAB_VOLUME-1111
其中后面的(scsi-0BUYVM_SLAB_VOLUME-1111)就是你的存储盘,结尾数字每个人不一样,注意要改你自己的。
格式化存储块
- mkfs.ext4 –F /dev/disk/by–id/scsi–0BUYVM_SLAB_VOLUME-1111
创建文件夹 (我没有注意,先装宝塔再来挂载,发现有问,不能访问了。于是就再次装了宝塔,所以提醒各位:挂载完www目录后再装宝塔。顺序不要搞反了)
mkdir /www
挂载到WWW目录,后期宝塔安装目录就是这个
mount –o discard,defaults /dev/disk/by–id/scsi–0BUYVM_SLAB_VOLUME–1111 /www
设置开机启动
vi /etc/fstab
在文件末尾添加一行内容 :(添加要挂载的盘格式为:磁盘分区 挂载目录 ext4defaults 0 0)
比如Buyvm这边应该是 (记得硬盘编号 和挂载目录修改成你自己的)
/dev/disk/by-id/scsi-0BUYVM_SLAB_VOLUME-1111 /bigpan ext4 defaults 0 0
或者用命令也可以
echo ‘/dev/disk/by-id/scsi-0BUYVM_SLAB_VOLUME-1111 /www ext4 defaults,nofail,discard 0 0’ | sudo tee –a /etc/fstab
[root@localhost ~]# df -h
Filesystem Size Used Avail Use% Mounted on
devtmpfs 469M 0 469M 0% /dev
tmpfs 485M 4.0K 485M 1% /dev/shm
tmpfs 485M 13M 473M 3% /run
tmpfs 485M 0 485M 0% /sys/fs/cgroup
/dev/vda1 20G 2.7G 16G 15% /
tmpfs 97M 0 97M 0% /run/user/0
/dev/sda 1007G 382M 956G 1% /www

目前来说挂载比较简单,挨着搬就可以了。有什么问题可以在下方留言。